
If you’ve ever tasted a perfectly cooked ceıvır, you know it’s more than just food; it’s an experience. This traditional dish hails from the rich culinary heritage of Turkey and is cherished for its unique flavors and incredible texture. Picture this: warm, flaky dough wrapped around savory fillings like seasoned meats or fresh vegetables, all cooked to golden perfection. The good news? You don’t need to visit a restaurant or wait for a special occasion to enjoy ceıvır. With the right ingredients and some handy tips, you can master this delightful dish right in your own kitchen. Whether you’re planning a family dinner or impressing friends at a gathering, making ceıvır is easier than you think—and incredibly rewarding! Ready to roll up your sleeves? Let’s dive into the art of crafting the perfect ceıvır at home!
Understanding the Ingredients and Equipment Needed
To create the perfect ceıvır, start with high-quality ingredients. The foundation is a simple dough made from flour, water, and salt. This combination yields a flexible texture that’s easy to work with.
Next, consider your choice of fillings. Traditional options include cheese or minced meat, but feel free to get creative! Spinach and feta or even spicy chicken can elevate your dish.
Now for the equipment. A rolling pin is essential for flattening the dough uniformly. You’ll also need a clean surface to roll on—preferably floured to prevent sticking.
A skillet or grill is crucial for cooking your ceıvır evenly. Ensure it heats properly before adding your uncooked pieces; this will help achieve that desired crispy exterior while keeping the inside soft and delicious.
Having these components ready sets you up for success in crafting an authentic ceıvır at home.
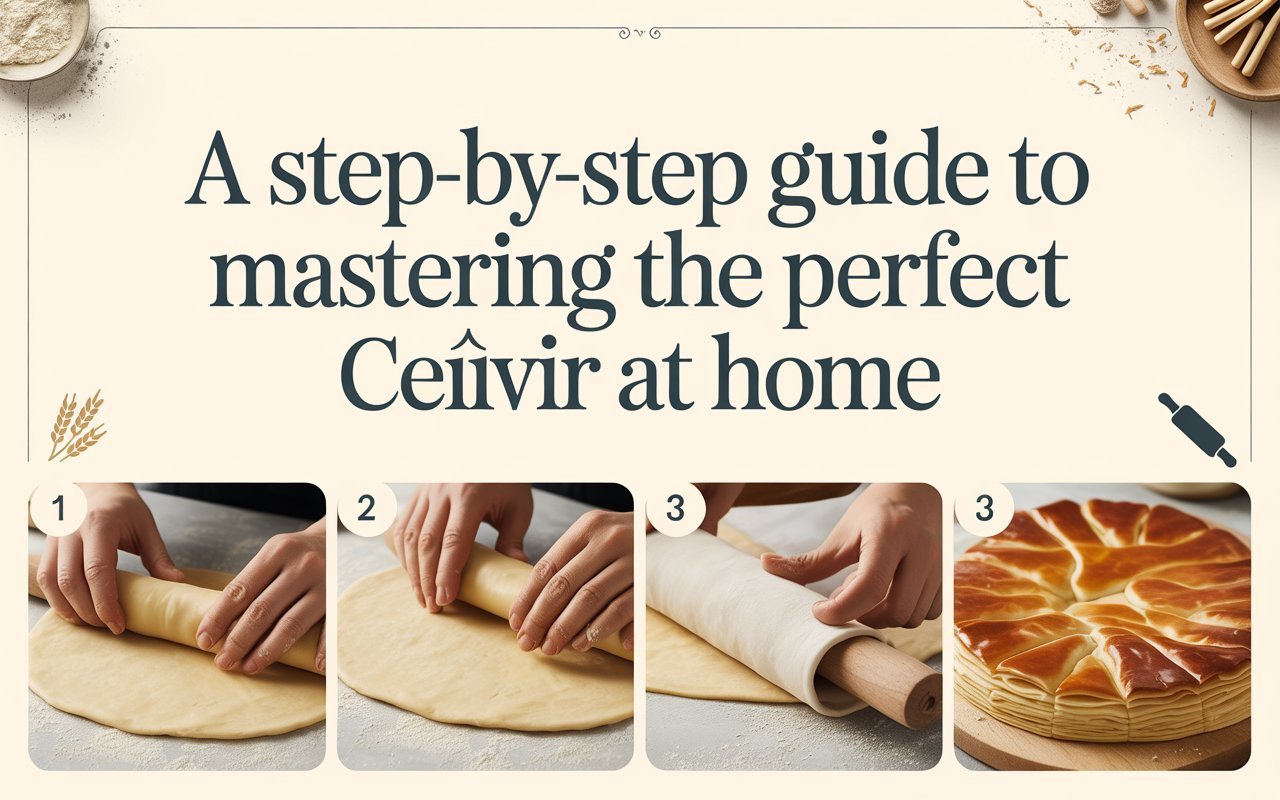
Step 1: Preparing the Dough
Preparing the dough is a crucial first step in crafting the perfect ceıvır. Start by gathering your ingredients: all-purpose flour, water, salt, and a splash of oil. This simple combination yields a versatile base.
In a large mixing bowl, combine the flour and salt. Gradually add water while stirring with your hand or a spoon until it forms a shaggy mass. Don’t rush this process; each ingredient plays its role in achieving that chewy texture.
Once combined, transfer the mixture to a floured surface. Knead for about 10 minutes until smooth and elastic. The more you work it, the better it will behave on the grill or stovetop.
After kneading, let your dough rest under a damp cloth for at least 30 minutes. This resting period allows gluten to develop further—key for that delightful bite you’ll love in every ceıvır slice!
Step 2: Rolling out the Dough and Shaping the Ceıvır
Once your dough has rested, it’s time to bring out your rolling pin. Begin by dusting your work surface with a bit of flour to prevent sticking.
Divide the dough into manageable pieces, depending on how large you want each ceıvır to be. Take one piece and flatten it slightly with your hands before rolling it out evenly. Aim for a thin layer—around 1/8 inch thick.
As you roll, turn the dough occasionally to maintain an even shape. This is crucial for cooking later on; uneven thickness can lead to inconsistent results.
Next comes shaping! Use a round cutter or simply trace around a bowl if precision isn’t key for you. To form an authentic ceıvır, fold gently over the filling of your choice and crimp the edges securely using your fingers or a fork. It’s all about sealing in that delightful goodness!
Step 3: Cooking the Ceıvır on a Stovetop or Grill
Cooking the ceıvır is where all your hard work pays off. Whether you choose a stovetop or grill, each method brings out unique flavors.
If using a stovetop, preheat a non-stick pan over medium heat. Lightly grease it with oil to prevent sticking. Place the shaped dough onto the pan and let it cook for about 2-3 minutes on each side until golden brown.
For grilling, fire up your barbecue and ensure it’s hot before placing the ceıvır directly on the grate. The smoking heat gives it that irresistible charred flavor while keeping the inside soft.
Keep an eye on them as they cook; every grill behaves differently. A quick flip can make all the difference between perfect and burnt! Enjoy this step; you’re just moments away from tasting your homemade creation.
Step 4: Tips for Achieving the Perfect Texture and Flavor
To achieve the perfect texture and flavor in your ceıvır, start with high-quality flour. Opt for bread flour if possible; it has a higher protein content that creates a chewier bite.
Don’t rush the resting period for your dough. Allowing it to relax helps develop gluten, making rolling easier and improving texture.
When shaping your ceıvır, aim for even thickness. This ensures uniform cooking and prevents some parts from being too chewy or tough.
Cooking temperature is crucial. A hot stovetop or grill gives you those lovely charred spots while keeping the inside soft. Keep an eye on them to prevent burning.
Season generously! A sprinkle of salt can elevate flavors dramatically. For added depth, consider brushing with melted butter or infusing herbs into your oil before cooking.
Variations and Additions to Make Your Ceıvır Stand
When it comes to making your ceıvır truly unique, the possibilities are endless. You can experiment with different fillings to elevate this traditional dish. For a savory twist, try adding minced meat seasoned with herbs and spices. Ground lamb or beef works beautifully, creating a hearty center that complements the dough.
Vegetarian options abound as well! Consider using sautéed spinach and feta cheese for a delightful Mediterranean flair. Adding diced bell peppers or mushrooms can introduce additional texture and flavor that will surprise your taste buds.
For those who enjoy exploring sweet flavors, why not fill your ceıvır with fruit? A mixture of apples and cinnamon offers a delicious dessert option that pairs perfectly with vanilla ice cream or whipped cream on the side.
Don’t forget about toppings! A drizzle of yogurt sauce or tahini can add richness while fresh herbs like parsley or cilantro bring brightness to every bite. Try sprinkling sesame seeds on top before cooking for an added crunch.
By incorporating these variations into your recipe repertoire, you’ll create ceıvır that’s both personal and memorable. Each batch becomes an opportunity to explore new tastes while staying true to this beloved classic dish from Turkish cuisine. Enjoying homemade ceıvır in all its forms makes any meal feel special!